Why and How to Test Your Pattern Library Part 2: Testing a Pattern Lab Project
Pattern Lab is a great tool for creating a pattern library using an atomic design approach. This tutorial demonstrates how to use Galen Framework to test patterns automatically across browsers so you can cut down on all that tedious manual testing.

This is part two of a two-part article.
- Part 1: Testing Strategy
- Part 2: Testing a Pattern Lab Project
In part 1 of this article, we looked at how automated cross-browser testing based on design specs can be a great way to improve the quality of a pattern library.
It makes sense to do as much testing as you can on pattern library examples, and not to repeat that testing within individual products. Product teams can then focus on functionality and implementation that is unique to them.
Executable specs and test results can also be published as part of documentation, and this is a great way to improve confidence and trust in a pattern library.
Check out part 1 for a full discussion of advantages and strategy around pattern library testing.
Why test a Pattern Lab project?
In this second part of the article, we’re going to dive into adding automated responsive design tests to a Pattern Lab project.
Pattern Lab is a popular tool for designing and developing using an atomic design approach. Atomic design advocates working from atoms, up through molecules and organisms until finally you are able to stitch together full templates and example pages.
Pattern Lab supports atomic design by allowing designers and developers to provide working examples of each level of component. You can nest components together using a templating language (the default is Mustache), so that a molecule can be composed of individual atoms, for example.
Pattern Lab is now at version 2, and there are two main editions: a PHP edition and a Node.js edition. We will look at testing both editions, but the approach differs only in how tests are started. Unless otherwise stated, everything here applies to both Pattern Lab editions.
Pattern Lab is well suited to automated testing. It provides consistent, context-free component examples that can be viewed at a unique URL on any browser or device. Additionally, component variations can be created with different content or state.
The approach described in this article can apply to any pattern library site or tool that provides testable examples at a consistent URL.
What we’re going to do
We’re going to use Pattern Lab’s example project, Hiketracker, as a focus for this tutorial.
By the end of this tutorial, you should be familiar with the basics of:
- using Galen Framework’s custom design spec language to write responsive design specs for a component
- running a single spec in a browser
- running multiple specs as part of a test suite
- providing different checks for tests at different viewport sizes
- running specs against different browsers installed on your PC
There are also example projects to download so that you can try running tests yourself.
How does Galen Framework work?
We’ll be using Galen Framework, which takes a unique approach to design and layout testing.
Unlike visual regression testing (VRT), which works by taking screen grabs of a component, Galen’s approach is based on design specifications.
Galen’s custom spec format allows authors to set down expectations about an element’s position relative to other elements. It also allows direct checking of element dimensions and final CSS characteristics.
Galen checks can be as precise as we wish. For example, we can expect an element to be exactly 12 pixels to the right of another. Or we can check that it is ‘about’ 12 pixels. Or in the range 10-14 pixels. We can also check that it is somewhere to the right of the another element.
This flexibility demonstrates how Galen’s creators understand the often imprecise nature of modern responsive web design, where pixel perfection isn’t possible or practical.
Galen’s tests are powered by Selenium WebDriver, which allows detailed inspection of a final rendered page in a variety of real browsers and devices. These browsers can be on our own PCs or provided by cloud testing services like Browserstack and Sauce Labs.
Right, enough pre-amble. Let’s get testing some patterns!
Set up and installation
You can follow the instructions here, or download the sample projects to get up and running quickly.
First of all, we need to install Pattern Lab 2 and create a project. You can use either the PHP or Node.JS editions of Pattern Lab. We will also need some patterns to test, and for the purposes of this article we will use Pattern Lab’s example project, Hiketracker.
PHP edition
We will use the standard Mustache edition of Pattern Lab PHP. Download the latest patternlab2-with-demo.zip file from the project releases page.
Once you have downloaded and extracted the zip file, make sure you can view your project with Hiketracker components by following the Get Up and Running instructions.
To run testing tasks, we’ll be using Composer, so you’ll need to have it installed as well. Follow the installation instructions.
Node.js edition
We will use the Gulp edition of Pattern Lab Node.JS. Download the latest pre-built zip file from the project releases page.
Once you have downloaded and extracted the zip file, open a terminal window and cd into the root of the project directory and run npm install. This will install Pattern Lab’s NPM dependencies.
You will also need to import the demo starter kit. To do that, run these commands as described in the project wiki:
npm install --save starterkit-mustache-demo
gulp patternlab:loadstarterkit --kit=starterkit-mustache-demo
Make sure you only do this on a new Pattern Lab project, as it will overwrite any patterns you have already created.
Finally, we’ll be using Gulp to run our design tests. So, install the gulp-galen plugin:
npm install --save gulp-galen
This will install Galen Framework as a dependency.
You should now be able to run and view your project with gulp patternlab:serve.
Installing Galen Framework globally
To run Galen tests, you’ll need to have Java installed. It’s best to download the latest Java JDK version for your platform from the Oracle website.
It’s useful to have Galen Framework installed globally, even if you’re using something like the gulp-galen plugin, which bundles Galen Framework with it. Follow the installation instructions on the Galen Framework site.
Writing a design spec
Now that we have everything set up, we can write a design spec!
We could write specs for atoms such as buttons and paragraphs, but as discussed in part 1 of this article, those are a better fit for visual regression tests, which we’re not covering here.
Galen specialises in checking responsive layouts, so it is better suited for testing compound patterns like molecules and organisms.
In this tutorial, we’ll test Hiketracker’s global header organism, as it is relatively simple, but has some important differences across breakpoints.
In the spirit of mobile first, we’ll start by testing the component on Firefox at a narrow viewport size of 432 by 736 pixels.
Here is what we expect to see:

And here is the full HTML structure:
<header class="c-header" role="banner">
  <a href="#" class="c-logo-link">
    <img src="../../images/logo.svg" class="c-logo c-logo-link__img" alt="HikeTracker" />
  </a>
  <div class="c-header__controls">
    <a href="#nav" class="nav-toggle nav-toggle-menu icon-menu">
      <span class="is-vishidden">Menu</span>
    </a>
    <a href="#search-form" class="nav-toggle nav-toggle-search icon-search">
      <span class="is-vishidden">Search</span>
    </a>
    <nav id="nav" class="c-primary-nav">
      <ul class="c-primary-nav__list">
        <li class="c-primary-nav__item">
          <a href="#" class="c-primary-nav__link">About</a>
        </li>
        <li class="c-primary-nav__item">
          <a href="#" class="c-primary-nav__link">Blog</a>
        </li>
        <li class="c-primary-nav__item">
          <a href="#" class="c-primary-nav__link">Contact</a>
        </li>
        <li class="c-primary-nav__item">
          <a href="#" class="c-primary-nav__link">Login</a>
        </li>
      </ul>
    </nav>
    <form method="post" class="c-search-form">
      <label for="search" class="c-search-form__label is-vishidden">
        Search the site
      </label>
      <input type="search" id="search"
        class="c-search-form__input" placeholder="Search the site" />
    </form>
  </div>
</header>
You can see that the small version hides the full nav and search form. These are shown when clicking on the hamburger menu and search icon respectively.
There are a number things we could check using Galen at this small size
- that the component takes up the full width available
- that the header height is as expected
- that the logo and icons are vertically aligned to the middle of the header container
- that the full nav and search form are not visible
- that the menu and search icons are aligned to the right of the header
Let’s write a design spec to check some of these.
Test folder structure
First we need somewhere for our specs to live. For the sake of simplicity in this tutorial, we’ll create a dedicated directory structure for all our test files.
Create a test directory at the top of the project with the following structure of sub-directories:
- test/
  - visual/
    - spec/
    - report/
We’ll keep all of our Galen test files in the visual directory to distinguish them from any other types of testing you might do in a project.
Creating the spec file
Now we can create our first spec file. We’re going to name the file according to the identifier conventions that Pattern Lab uses for its patterns. The reason for this will become clear when we come to test multiple patterns.
In the case of the global header organism, the pattern’s full identifier is 02-organisms-00-global-header. You can find this for yourself by looking at the URL that’s used when you open a pattern in a new window from the cog icon in the top right.
Alternatively, you can construct the identifier yourself by using the format [pattern-type-id]-[sub-pattern-type-id]-[pattern-name]. Each identifier is simply an expansion of the path to the pattern from the source/_patterns directory in your project.
Now that we have the identifier, create a new file at test/visual/spec/02-organisms-00-global-header.gspec. The gspec suffix indicates that this is a Galen spec file.
The structure of a spec file
Galen spec files are divided into two main sections: object definitions and object specs.
First, object definitions allow us to name DOM elements for use in the object specs. This is done by identifying elements using standard CSS selectors.
Here is our first object definition:
@objects
  header        .c-header
The @objects directive tells Galen that what follows are object definitions. We then have a name and CSS selector pair. The header name corresponds to an element with a class of c-header. That’s our top level <header> element for the component.
Note that indentation is meaningful in Galen spec files. It’s used to indicate nesting and structure. You can use tabs, or different amounts of spaces, but be consistent.
The main part of the spec file is usually taken up by object specs. These describe the expectations we have and checks we want to make about the objects defined in the object definitions section.
Here is our first very simple check of our header object:
= Main section =
  header:
    width 100% of viewport/width
    height ~64px
Specs can be divided into sections, and the = Main section = lets Galen know that the nested items are object specs.
We then give the name of the element from our object definitions that we want to check – in this case the header element. Nested within the element are the checks we want to perform on it. In this case we want the header element to be 100% of the available viewport width and about 64 pixels in height.
Galen will convert approximate values like this to a range that depends on the galen.range.approximation config setting. By default this is three pixels each way.
Why are we using an approximate dimension here? Well, we know from experience that different rendering engines can compute layout slightly differently. Usually this means differences of one or two pixels, so a tolerance of three pixels is usually enough.
Here is our spec file so far:
@objects
  header        .c-header

= Main section =
  header:
    width 100% of viewport/width
    height ~64px
Adding more checks
That doesn’t do much, so let’s add some more checks. Apart from the overall width and height of the header as a whole, let’s check that:
- the logo, navToggle and searchToggle are visible and centered vertically inside the header
- the navToggle is to the left of the searchToggle and they are aligned to the right of the header.
First we add some more object definitions:
@objects
  header        .c-header
  logo          .c-logo
  navToggle     .nav-toggle-menu
  searchToggle  .nav-toggle-search
We are now going to create checks for each of the new elements as described above. Add these checks below your header check block:
logo:
  centered vertically inside header
  inside header 16px left

navToggle:
  visible
  centered vertically inside header
  left-of searchToggle 0px
  width ~53px
  height ~49px

searchToggle:
  visible
  centered vertically inside header
  inside header 16px right
  width ~53px
  height ~49px
About Galen’s checks
You can see how this spec format can be read and understood by a human, but is also used by Galen to run checks against actual rendered components.
Of course, you can’t just use any old English. The spec format is still strict, so you’ll be using Galen’s spec format documentation a lot at first.
These examples (centered inside, left-of) also demonstrate some of Galen’s relative positioning checks. In responsive web design, we are most interested in how elements are laid out relative to each other. Galen provides lots of powerful checks for relative positioning that range from specific to the extremely vague:
- Check the exact distance between two elements
- Check that an element is above, below, to the left or to the right of another, and by how much
- Check that an element is wholly inside, wholly outside, or overlapping another
- Check that two elements are aligned horizontally or vertically, and along what axis
- Check that an element is centered inside another
- Check if an element is ‘near’ another
Take a look at the full range of checks available on the Galen site.
Running the spec
Here is the final spec file that we will test:
@objects
  header        .c-header
  logo          .c-logo
  navToggle     .nav-toggle-menu
  searchToggle  .nav-toggle-search

= Main section =
  header:
    width 100% of viewport/width
    height ~64px

  logo:
    centered vertically inside header
    inside header 16px left

  navToggle:
    visible
    centered vertically inside header
    left-of searchToggle 0px
    width ~53px
    height ~49px

  searchToggle:
    visible
    centered vertically inside header
    inside header 0px right
    width ~53px
    height ~49px
Running a single spec from the terminal
We can run this spec against a single browser from the command line by using Galen’s own galen check command.
First we need to have Pattern Lab running, so start it using gulp patternlab:serve for the Node.JS edition or php core/console --server for the PHP edition.
In another terminal session, run one of the below commands from the root of the project.
For PHP:
galen check test/visual/spec/02-organisms-00-global-header.gspec \
  --url "http://localhost:8080/patterns/02-organisms-00-global-header/02-organisms-00-global-header.html" \
  --size "432x786" \
  --htmlreport "test/visual/report"
For Node.JS:
galen check test/visual/spec/02-organisms-00-global-header.gspec \
  --url "http://localhost:3000/patterns/02-organisms-00-global-header/02-organisms-00-global-header.rendered.html" \
  --size "432x786" \
  --htmlreport "test/visual/report"
The PHP and Node.JS editions of Pattern lab differ in the URLs used for viewing bare pattern examples, so it is important to use the correct one. You can grab the URL for yourself by clicking the ‘Open in new window’ menu item from the settings dropdown in the Pattern Lab UI.
NB. The \ backslash above is used to separate new lines in terminal commands. You should be able to paste the above commands into your terminal prompt as is.
Running this rather long command causes this to happen:
Here is what is happening:
- Galen outputs the location of the spec file and the full check command to the terminal,
- Galen opens a Firefox window with a fresh profile at the viewport dimensions given by the
--sizeflag, - Galen loads the page specified by the
--urlflag, - Once the page has loaded, it uses the Selenium WebDriver API to query elements on the page according to our spec,
- Check results are output to the terminal
- Galen generates a test report in the directory specified by our
--htmlreportflag.
By default, Galen will use Firefox to run tests, because it comes bundled with a WebDriver implementation.
Opening and reading the test report
For each test run, Galen will generate a detailed report of test results if requested. We have asked for a human-readable HTML version, but it will also export reports in JSON, jUnit and TestNG formats if requested. These formats are more useful for integrating with a continuous integration server.
Open the HTML report in your default browser with the command below, or just browse to the file from the browser’s File / Open menu.
open test/visual/report/report.html
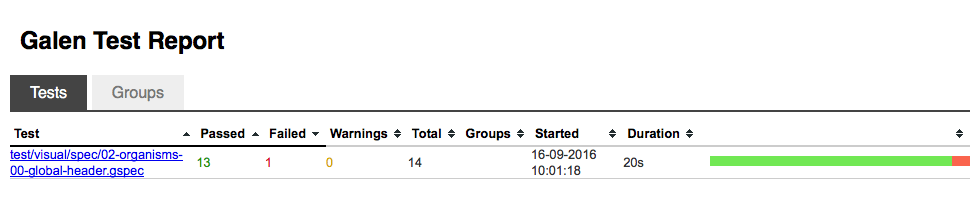
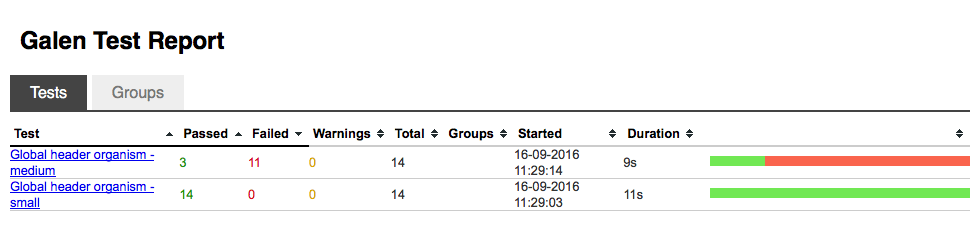
The main report page shows a summary of all specs run with an indicator of check passes and failures. In this case we only have spec with 13 passed checks and one failed check:
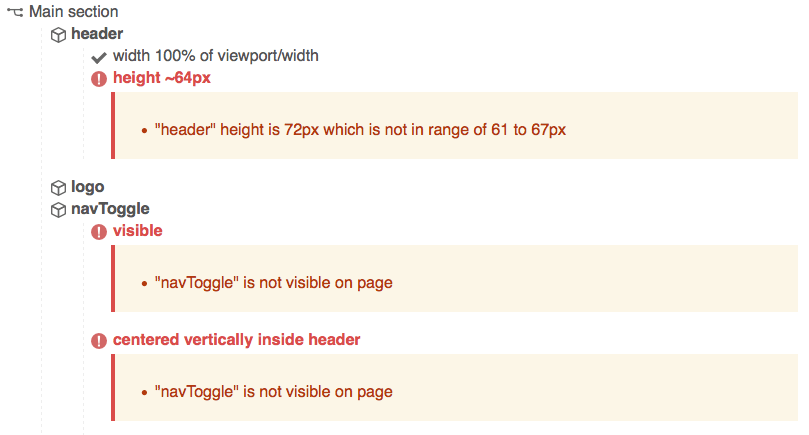
We can click into the individual spec to see a full breakdown of individual checks carried out. The checks that have passed are collapsed by default, and any failures are expanded:
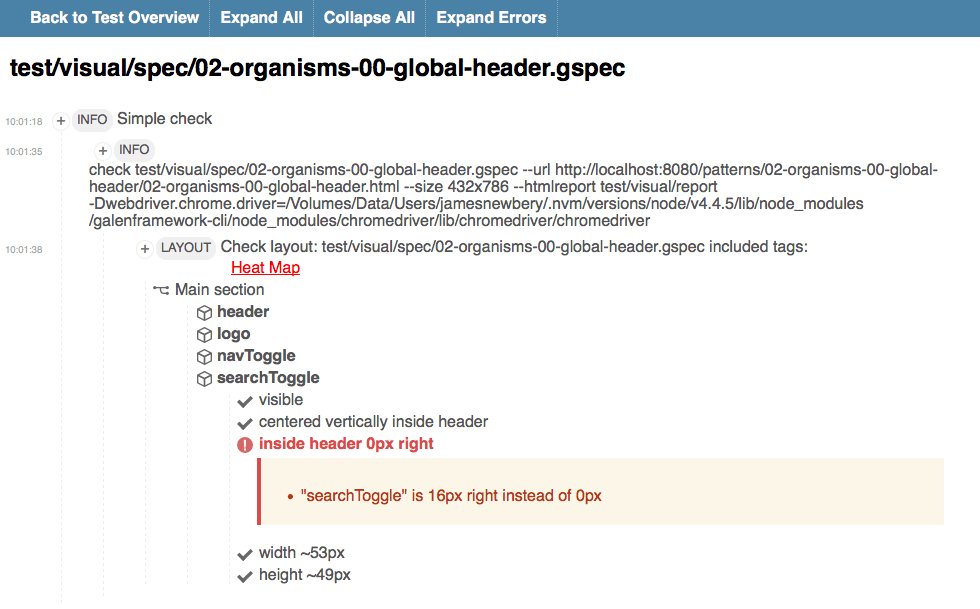
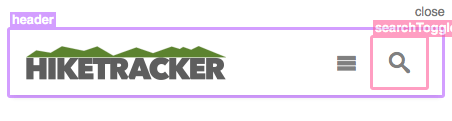
Finally, individual checks can also be clicked to show a screen grab. Galen even adds a highlight around the elements that were part of the check:
From this, you should begin to see how the detailed nature of Galen’s report output can be useful not just for debugging and investigating, but also for documenting exactly what has been tested down to the finest detail.
For our single failure, Galen has told us exactly what the problem is. We mistakenly expected that the search toggle icon was up against the right hand side of the header. In fact it is 16px inside the header. We can change our check for that:
searchToggle:
  inside header 16px right
Re-running that causes all the checks to pass.
Now it’s time to get serious. In a real pattern library, we’ll be testing a lot of patterns, so we need to organise the individual specs efficiently into a test suite. Let’s do that next.
Organising specs with a test suite
Galen provides a handy mechanism for running multiple specs – the test suite.
Let’s create a test suite to run our existing global header spec.
First, create a file at test/visual/suite.test. The test suffix distinguishes Galen test suite files from individual spec files.
Our test suite file takes the place of the galen check command we used above, and so contains similar details. Again, the details vary slightly between Node.JS and PHP editions. Paste the relevant version into the suite.test file you just created.
For PHP:
Global header organism
  http://localhost:8080/patterns/02-organisms-00-global-header/02-organisms-00-global-header.html  432x786
    check test/visual/spec/02-organisms-00-global-header.gspec
For Node.JS:
Global header organism
  http://localhost:3000/patterns/02-organisms-00-global-header/02-organisms-00-global-header.rendered.html  432x786
    check test/visual/spec/02-organisms-00-global-header.gspec
There are three lines to understand:
- The name of the test to use in the report
- The URL of the page to visit and the viewport dimensions to use
- A check instruction with the path of the spec file to use
To run our new test suite, we can use the galen test command, which is the same for both PHP and Node.JS versions of Pattern Lab:
galen test test/visual/suite.test --htmlreport "test/visual/report"
That’s much simpler now as we have put most of the details into the test file. The test runs in much the same way as before.
Now that we have a test suite, we can look at different ways to run it that tie in with the project build tools.
At this point, we’ll look at the PHP and Node.JS editions of Pattern lab separately. For PHP, we’ll use Composer to run our test suite. For Node.JS, we’ll use Gulp. Galen is not tied to either of these and can easily be integrated with most build tools.
Running a test suite using Composer (PHP)
Composer is a dependency manager for PHP, but can also be used to run scripts. The PHP edition of Pattern Lab 2 makes heavy use of Composer scripts during installation and as shortcuts for working with a project. For example, you can run composer start to start the Pattern Lab server with file watching.
To create a custom Composer script to run our Galen test suite, add the following script entry to the "scripts" object in the project composer.json file:
{
  "scripts": {
    // Other scripts here
    "test": "galen test test/visual/suite.test --htmlreport test/visual/report"
  }
}
With that saved, you can now run composer start in one terminal session and then composer test in another.
There may also be a nice way to set up a Composer script to start the server for you when you run the test command. If anyone knows how to do this, get in touch and I’ll update this section.
Running a test suite using Gulp (Node.JS)
The Node.JS edition of Pattern Lab can use either Gulp or Grunt as a task runner. Fortunately, there are Galen plugins for both Gulp and Grunt. You could also run tests using an NPM script in a similar way to the Composer approach above.
Here we will focus on using Gulp. If you haven’t already done so, make sure you have installed the gulp-galen plugin with npm install --save gulp-galen.
I advise creating a self-contained section at the bottom of your gulpfile.js so that you can easily merge in future updates to Pattern Lab. Even better, import your custom tasks into the main gulpfile. The example projects download includes a full example of various handy Gulpfile additions for running tests.
Here is all that is needed to run a simple Galen test suite:
var gulpGalen = require('gulp-galen');

gulp.task('test', function(done) {
  return gulp
    .src('test/visual/suite.test')
    .pipe(gulpGalen.test({
      'htmlreport': path.resolve(__dirname, 'test/visual/report/')
    }));
});
The gulp-galen plugin works in the standard Gulp way:
- We import the plugin using
require. - We define the task using
gulp.task(). - The body of the task takes a src file pattern (our test suite)
- The file pattern is piped into a
gulpGalen.test()function. - We pass any configuration we need to provide to Galen in this function. In this case, we set the path of the HTML report.
To run this task, we need to have Pattern Lab running in another terminal session using gulp patternlab:serve.
Our test task can be run in another session using gulp test. As before, Galen should run our checks in a Firefox session and produce a report.
We now have a test suite that runs with one simple command. We can use this suite as the basis for all our Pattern Lab tests. Now let’s move on to running our spec at different viewport sizes.
Running a spec at different viewport sizes
The Hiketracker global header is responsive. For larger viewport sizes, it will show the full navigation menu and search input field:

To test these differences, there are two things we need from Galen:
- the ability to repeat a spec test at different viewport dimensions
- the ability to change the checks we perform to reflect the differences in layout across breakpoints
Galen provides for this through the use of parameterized tests and tagging.
Parameter tables
Let’s look at repeating spec checks for different viewport sizes. We’ll check the global header at 1024 by 768 pixels as well as our original smaller viewport size.
In our test suite file, we could just add another check for our larger viewport like this:
Global header organism - small
  http://localhost:8080/patterns/02-organisms-00-global-header/02-organisms-00-global-header.html  432x786
    check test/visual/spec/02-organisms-00-global-header.gspec

Global header organism - medium
  http://localhost:8080/patterns/02-organisms-00-global-header/02-organisms-00-global-header.html  1024x768
    check test/visual/spec/02-organisms-00-global-header.gspec
But that is rather repetitive. Your test suite will quickly become a pain to maintain if you are testing many patterns across viewports and browsers.
Instead, we can state our check once and use a table of parameters that we want to cycle through.
Let’s create our viewport parameter table. This should go at the top of test/visual/suite.test:
@@ table viewports
  | viewportName | size     |
  | small        | 432x786  |
  | medium       | 1024x768 |
A parameter table must contain a header row that is used for parameter names. The remaining rows then provide any values you need. So we have two viewports named small and medium. You can use as many viewports as you wish to reflect the different breakpoints in use in your own project.
To use the viewports parameter table, we just reference it above our spec check instruction, and insert parameter tokens into the check instruction where we want the values to be placed. Here is the full test suite file at test/visual/suite.test:
@@ table viewports
  | viewportName | size     |
  | small        | 432x786  |
  | medium       | 1024x768 |

@@ parameterized using viewports
Global header organism - ${viewportName}
  http://localhost:8080/patterns/02-organisms-00-global-header/02-organisms-00-global-header.html  ${size}
    check test/visual/spec/02-organisms-00-global-header.gspec
NB. Don’t forget to use the correct URL for your version of Pattern Lab.
The @@ parameterized using viewports line will cause Galen to cycle over the rows in the referenced parameter table, replacing any tokens it finds with parameter values. We have injected the viewportName and size parameters into our test using the ${variableName} syntax.
Running this now causes Galen to run two sets of checks, with the following results:
Uh oh. We have a bunch of test failures. Inspecting the results shows up three problems:
First, the global header is taller at this width. Secondly and thirdly, the navigation toggle and search toggle icons are not displayed at this width because the navigation menu and search forms are shown in full instead.
Using tags to vary spec checks
We can write checks to cover these problems, but how do we tell Galen which check to perform at each viewport size?
The answer is to use tagging. Within a single gspec file, checks can be grouped using one or more tags. Only when the test suite passes in a matching tag will those checks run. In our case, we’ll use a different tag for each viewport.
Using tags requires changes to both our test suite and our global header spec.
Let’s look at the test suite. First we need to add a tag column to our viewports parameter table in test/visual/suite.test:
@@ table viewports
  | viewportName | size     | tags   |
  | small        | 432x786  | small  |
  | medium       | 1024x768 | medium |
We could just re-use the viewportName parameter, but that might limit some flexibility later, so I don’t advise it.
Now we need to use those tags in the check instruction in the same file. It just goes at the end of check line using an --include flag:
@@ parameterized using viewports
Global header organism - ${viewportName}
  http://localhost:8080/patterns/02-organisms-00-global-header/02-organisms-00-global-header.html  ${size}
    check test/visual/spec/02-organisms-00-global-header.gspec --include "${tags}"
When Galen runs the suite, it will only include sections of the gspec file that match the tags provided.
To take advantage of this, we now need to modify the spec file to target checks for our different viewport tags.
Because we have already written some checks for our small viewport, we should prevent those from running at the medium viewport by wrapping them in a tag group:
= Main section =
  @on small
    header:
      width 100% of viewport/width
      height ~64px

    logo:
      centered vertically inside header
      inside header 16px left
Any checks nested within @on small will only run if the spec is run with the small tag. We can then create another tag group for the medium viewport tag:
  @on medium
    navToggle:
      absent

    searchToggle:
      absent
These two checks just validate that the nav and search toggle buttons are not visible at medium size.
Some checks will be true for all viewport sizes. To avoid duplicating checks in each tag group, we can use a special @on * wildcard tag group and move some of the checks into that. Galen will run these checks no matter what tags are passed in. For example:
  @on *
    header:
      width 100% of viewport/width

    logo:
      centered vertically inside header
      inside header 16px left
Here is a final spec showing differing checks for different viewports:
@objects
  header        .c-header
  logo          .c-logo
  navToggle     .nav-toggle-menu
  searchToggle  .nav-toggle-search
  searchField   .c-search-form__input

= Main section =
  @on *
    header:
      width 100% of viewport/width

    logo:
      centered vertically inside header
      inside header 16px left

  @on small
    navToggle:
      visible
      centered vertically inside header
      left-of searchToggle 0px
      width ~53px
      height ~49px

    searchToggle:
      visible
      centered vertically inside header
      inside header 16px right
      width ~53px
      height ~49px

    searchField:
      absent

  @on medium
    navToggle:
      absent

    searchToggle:
      absent

    searchField:
      visible
      centered vertically inside header
      inside header 16px right
Note how we haven’t made any checks of the navigation menu. We’ll discuss why this is later.
Re-running the test suite with these checks now produces these results:
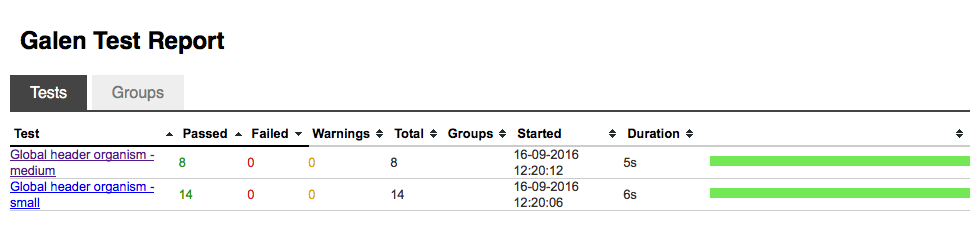
We can see that although two tests used the same spec file, there were eight checks for the medium viewport and 14 checks for the small viewport.
You should see now how parameterized tests and tagging make Galen a powerful tool for testing responsive components.
Running specs across browsers
So, we can run different checks of a pattern depending on viewport size. Now let’s really take things up a notch by testing on across different browsers.
In this article we will focus on commonly available desktop browsers. But Galen can be used to test on any browser that has a compatible Selenium WebDriver implementation. You can also use Selenium’s grid capabilities to test on remote devices provided by testing services like BrowserStack or Sauce Labs. This opens up the possibility of testing across mobile device emulators and real devices.
We’re going to look at testing on Safari, Firefox and Chrome on MacOS. But there are WebDriver implementations for Microsoft Edge, Microsoft Internet Explorer, Opera, Android and iOS too.
Installing WebDriver implementations
If you are using MacOS (OS X) then you probably only need to manually install ChromeDriver. Galen attempts to install SafariDriver during installation, and Firefox comes with GeckoDriver built in.
If you are a Homebrew user, you can run brew install chromedriver from a terminal prompt to install ChromeDriver. Otherwise, follow the instructions on the ChromeDriver site.
Windows users can run tests against Microsoft Edge using Microsoft WebDriver.
You can also run tests the headless browsers PhantomJS and SlimerJS. These will run faster than using a real browser. Each has a WebDriver implementation built in.
A parameter table for browsers
Just as we used a parameter table to run checks on different viewports, we can do the same to run checks across different browsers.
In our test suite file test/visual/suite.test, let’s add a browsers table at the top of the file:
@@ table browsers
  | browser |
  | safari  |
  | firefox |
  | chrome  |
Feel free to modify this table based on what you have available.
We use a single-column table. Selenium identifies browsers installed on the same machine by these names.
To run tests across these browsers, we make some changes to our check command block:
@@ parameterized using browsers
@@ parameterized using viewports
Global header organism - ${viewportName} on ${browser}
  selenium ${browser} http://localhost:8080/patterns/02-organisms-00-global-header/02-organisms-00-global-header.html  ${size}
    check test/visual/spec/02-organisms-00-global-header.gspec --include "${tags}"
We have:
- Added the
@@ parameterized using browsersdirective - Added the browser name to the test title
- Added
selenium ${browser}in front of the page URL. This instructs Galen which WebDriver implementation to use.
Again, this example is for the PHP edition of Pattern Lab. Make sure you have the correct URL for your edition.
When we run our test again (using composer test or gulp test:visual), we’ll see Safari, Firefox and Chrome windows opening and repeating the tests.
Here are the results:
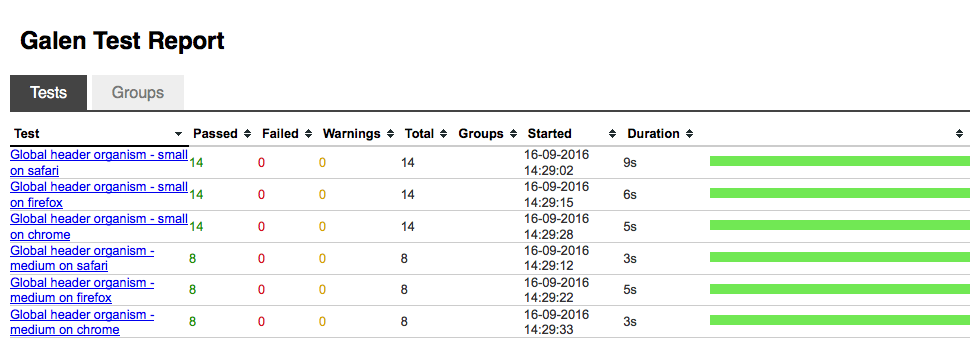
The creators of Hiretracker have done a good job of making the global header work across these browsers, because everything passes.
Handling cross-browser inconsistency
If you do come across browser inconsistencies, you can take one of three approaches:
- Accommodate acceptable differences using value ranges and approximations in tests
- Modify the code to eliminate inconsistencies
- Isolate checks for individual browsers using tagging
My rule of thumb would be to attempt code changes first, provided they don’t require browser detection or hacks. If there is just a pixel or two difference, use a range or approximate value in the Galen specs, preferably with a comment to indicate why it is there.
Isolating checks for individual browsers should only really be done where intentional feature detection is being used.
Adding another spec
You may have noticed that we have not written specs for the layout of the primary navigation menu that forms part of the global header pattern. That’s because it is a molecule of its own, so we can test it independently.
Let’s add a short test of the primary navigation molecule to our test suite.
Parameterized tests for components
We need to use a new spec file for testing the primary navigation molecule.
Guess what? Instead of duplicating our check block, we can use yet another parameter table! This means that whenever we write a new spec, we just need to create a new row in a parameter table to get the test running.
Insert this at the top of the test/visual/suite.test file:
@@ table components
  | componentName | componentID                         |
  | Primary Nav   | 01-molecules-navigation-primary-nav |
  | Global Header | 02-organisms-00-global-header       |
We provide a friendly name and the Pattern Lab ID for each component we want to test.
Next, we need to modify our check command block to use the new table:
@@ parameterized using components
@@ parameterized using browsers
@@ parameterized using viewports
${componentName} on ${browser} at ${viewportName} size
  selenium ${browser} http://localhost:8080/patterns/${componentID}/${componentID}.html  ${size}
    check test/visual/spec/${componentID}.gspec --include "${tags}"
We have:
- Added the
@@ parameterized using componentsdirective - Modified the test title to inject the component name
- Used the component ID to construct the page URL
- Used the component ID to run the relevant spec file
Once again, be sure to use the right URL pattern for your edition of Pattern Lab. The Node.JS version uses port 3000 and has a suffix of .rendered.html.
Creating a new spec
Let’s quickly create a new spec file at test/visual/spec/01-molecules-navigation-primary-nav.gspec:
@objects
  nav       .c-primary-nav
    list    .c-primary-nav__list
    item-*  .c-primary-nav__item
    link-*  .c-primary-nav__link

= Main section =
  @on small
    nav:
      absent

  @on medium
    global:
      count any nav.item-* is 4
      count any nav.item-* is 4
      count visible nav.item-* is 4
      count visible nav.link-* is 4

    nav:
      visible
      height 50 to 60px

    nav.item-*:
      height 50 to 60px
      inside nav.list 0px top bottom
There are a few things worth noting with this spec:
- Object definitions can be nested, so that a period can be used to access nested objects. For example,
nav.list. - Object definitions can use a wildcard
*selector to automatically create a group of numbered elements that match the same selector - The primary navigation is not displayed by default at our small viewport width, even when viewed in isolation
- We can count elements in an object group
- We can run checks against each item in an object group (the
nav.item-*block in the above example).
When we run the suite, we now have 12 separate test results:
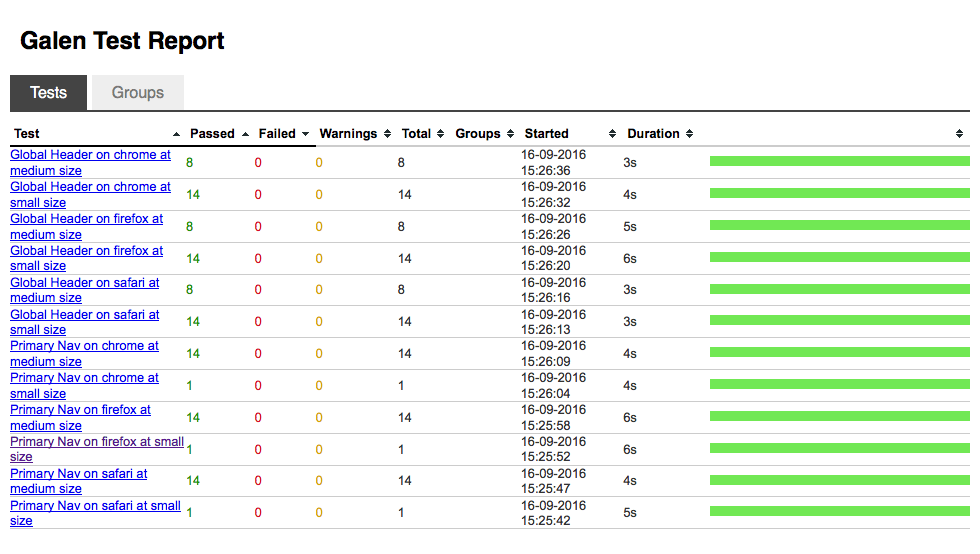
Summary
We’ve seen how we can build up a sophisticated suite of design specs, and use those specs to run automated tests across difference browsers, viewports and patterns.
You should now be getting an idea of the power of Galen Framework for testing Pattern Lab projects, and pattern libraries in general.
Here is an approach and tool that could really improve the quality of our work, speed up development times and improve confidence and trust in a pattern library by those who use it as a basis for their products.
Download the examples
I have bundled up all the examples here into full Pattern Lab projects so you can see tests running for yourself and experiment at will.
With the working examples, I have also included some extra things you can do with Galen Framework and Pattern Lab:
Testing pattern variants
Pattern Lab has a great feature called pseudo-patterns that allows us to easily create pattern variants. Variants are useful for testing components in different states, or for exposing a component to edge-cases such as extra long content.
Running tests quickly during development
So far we have created test tasks that run in real browsers. These tasks have to be kicked off manually. During development, it can be useful to have a task that runs automatically whenever you make changes for rapid feedback. The example projects include a task that runs on PhantomJS for increased speed.
The Node.JS project even includes a development task that runs tests automatically as you make changes.
Download the examples using the form below
Other things you can do with Galen Framework
Galen Framework can also be used to:
- Test on a huge range of browser and devices using cloud testing services like Browserstack and Sauce Labs
- Run design tests as part of a continuous integration job
- Test the functionality of dynamic components
- Publish your test results with your pattern library
- Run visual regression tests
To find out more about all this, download the project files by completing the form below.
You’ll receive a free chapter from my book Automated Responsive Design Testing and get daily emails about front-end development leadership thrown in.
Previous: Part 1: Testing Strategy